
I am going to broach a delicate subject in a sensitive manner – surely a new thing for me. I normally try to make a point in an argument with a 17 pounder round.
I am going to criticize someone for a product I have tried – in the full knowledge that I may be at fault as much as anyone. I do not want to offend, but I do want to warn.
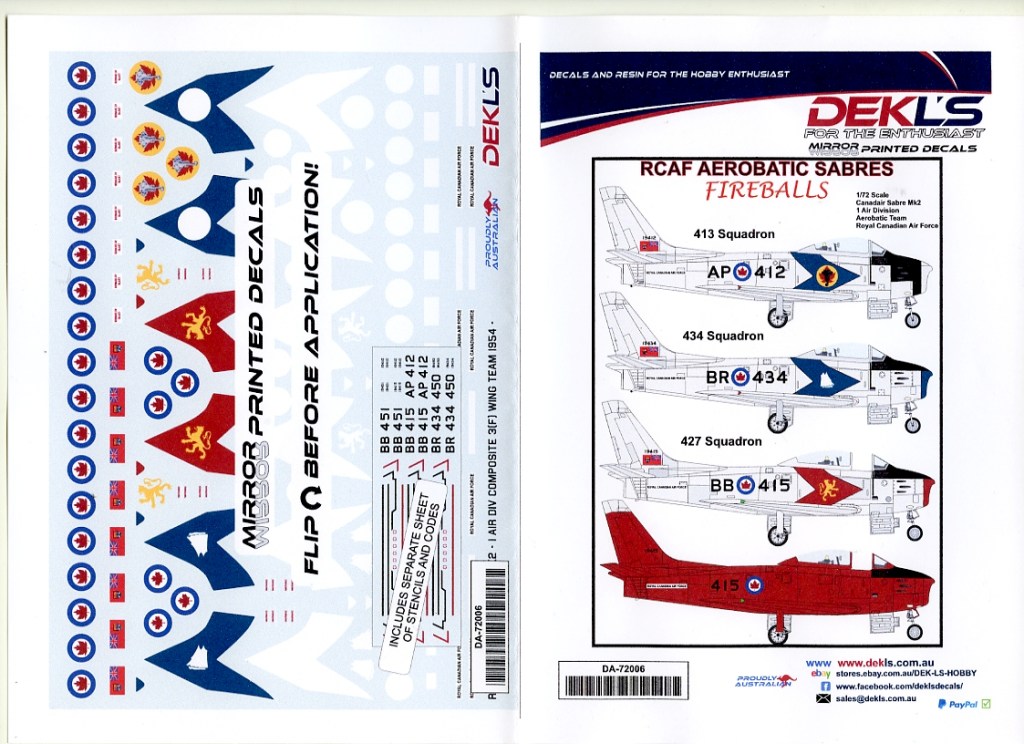
At a recent WASMEX show I bought an AIrfix Canadair Sabre at the swap meet, and then was intrigued to find a set of aftermarket decals that would convert a fighter plane to an air show performer. They were not dear and the sheet seemed to have a number of options included on it. Certainly the literature that was in the pack showed that the maker had researched the subject thoroughly.
I was a little taken aback to see that the decals were printed in reverse and that one needed to place the cut sheet over the model and slide the paper away from above rather than below,. The young man at the trade counter said it was because their printer did not do white and you needed to do two layers to get the appropriate insignia.
Well, I painted the model, glossed over the silver with acrylic, and started to apply the decals. I did so at my model club with one of the other members who also has some of these decals in his stash watching on. I was acting as the guinea pig.
The decals trimmed well – released early from their paper, and went on pretty easily. I followed the directions exactly and put a few drops of decal water down on the model before the decal. Once positioned, I blotted and dried them as per usual. After all the decals were on, I carefully boxed the model for transport home, intending to do an overcoat of clear acrylic once back in the Little Workshop.
It was a bit of a shock once I got there to discover about four of the decals off the model and floating about the box. I carefully picked them back up and put them back on – using spares for the ones that had completely disappeared – and eventually was confident enough to give the plane a light coat. Even at low pressure a couple of the serial numbers from the tail blew away and were lost. At that stage of the game I decided to just accept the results that were remaining and consign the whole idea of the reverse decal to the ” bad idea bin “.
I went back to the instruction sheets looking for a clue as to what had gone wrong. Here’s a scan of the directions:

Later, discussing the situation with one of the chaps in the Metro Hobbies store in Melbourne, we think we hit upon the weak spot – a spot that is not covered in the instructions. It was the fact that the open outer surface of the decals that will eventually snuggle to the painted model had no glue or adhesive on it at all. Regular decals apparently do have some form of gum adhesive – a vegetable one probably, that actually glues the thing to the model. Not so here.
So I am going to make an experiment. There are plenty more roundels and small numbers on the sheet. I will paint a scrap wing, then prepare the reverse decal as per instructions. But before the decal goes down on the plastic I’ll put a tiny drop of thinned school glue – the clear mucilage type – on the outer surface. I can wipe away any excess that seeps past the edges as I press the decal down. Then once it dries I’ll see if the thing can stand the normal strains of spray varnishing.
It seems a shame to entirely condemn the sheet of Canadian roundels and fin flashes as well as what may be good numbers. Doubt I’ll want another aerobatic show plane, but there are three more service fighters on the sheet. If it works, I’ll share the idea with Derek.
Addendum: Before I got to the school glue stage, a bottle of Tamiya Decal Glue appeared on the shelf at Hobbytech. I did the experiment with it and it proved totally satisfactory. So I will get to use the rest of the sheet eventually.


Leave a reply to Dick Stein Cancel reply