
My pleasure at a Christmas present continues to grow.
You’ve read my notes about the Slovakian plastic model jigs I received as a present this last Christmas. They are in daily use in the production of the 1:72 aircraft kits and I am learning to manage them better.
I”m still not sure if the 5-minute epoxy that joins the clear perspex parts is going to hold up on a long term basis, but so far we are going along well. If I had idle moments ( I have not, being fully engaged in retirement… ) I would drill and pin the joints with brads and super-glue. Watch this space.
The triumph for today concerned the Dewoitine D.510 and the tail decals. These are the only markings from the decal sheet that were used for this aircraft. The Spanish Republican Air Force did not go in for complex insignia or extra unit markings…I suspect they had so few planes that they could count them one by one. In any case they designate their air force with red bands on the wings and fuselage and a tri-colour tail aft of he rudder pintle.*
This was the decal area – flat and easy to apply, but not if you have to juggle the model with one hand and simultaneously use your other two hands to hold the tweezers and the water brush. I cannot sustain spinning plates or rubber balls on stage either.
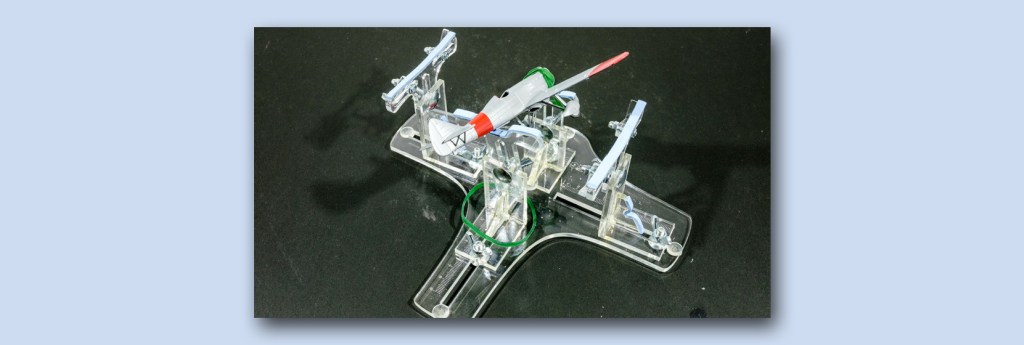
The Slovakian jigs have a small slot cut into the inner triangular brace with enough space to line them with foam rubber – each slot is opposite a wing pad. You simply tilt you model wingtip into the slot and let the fuselage rest on front or rear cradle – and loop a small rubber band or hair tie over the nearest solid point.
The model is canted over, the tail is presented clearly, and the structure is rigid. You have both hands free to apply the decal or paint the part. You can rest the heels of your hand on the bench and your fingers become rock-steady.
As a result, even dodgy decals can be slid off and set down, and the result becomes perfect.


Leave a comment